Tuesday, August 21, 2012

Peach Shortbread Pastries


I love Shortbread in all its glorious forms! As a crisp cookie or smooth biscoff spread. But when you can get the best of both worlds, why settle for just one? Hence was born the mighty Shortbread Pastry! Crumbly, gooey, soft and delicious! I used Peaches to elevate this pastry, but you can use pretty much any fruit you like – blueberries, raspberries, strawberries, kiwi or a combination of these! (Mental note to try a combo next time)

The key to a delicious tasting shortbread …the kind you get in the store….is using brown butter. What is brown butter you ask? And more importantly, where can I find this magical ingredient? Right in your own pantry is the simple and welcome answer! Brown butter is nothing more than browned butter! Keep reading to see how easy this recipe is, and I swear when you feed your friends and family these delectable squares of goodness, they will say “It’s just like you would get in a fancy bakery!”

Ingredients:
1 cup regular sugar
1 tsp baking powder
2 ¾ cups (plus 2 tbsp) cups all-purpose flour
1/4 tsp cinnamon
1/8 tsp freshly grated nutmeg
¼ tsp of Almond extract
¼ tsp salt
1 cup (2 sticks) cold unsalted butter
1 large egg
2 -4 peaches, pitted and thinly sliced (depends on how much fruit you really want)

Method:
1. Brown your butter: Melt butter in a small/medium saucepan over medium-low heat. Once it starts to turn brown and smell nutty (this takes a few minutes, but don’t take your eyes off it or by the laws of nature, it will burn!) take it off the heat. Transfer to a container and set it in the freezer until solid (about 30 minutes).
2. Preheat your oven to 375°F (190°C). Grease a 9×13 inch pan.
In a separate bowl, start with your dry ingredients. Mix together sugar, baking powder, flour, salt and spices.
3. Next, using a fork, blend the solidified brown butter, almond extract and egg into the flour mixture. You want the resulting dough to resemble coarse crumbs.
4. Taking 3/4th  of the crumbs, pat into the greased pan, firmly.
5. Next, arrange peach slices over crumb base in a single layer. People eat with their eyes first, so make it look pretty!!


6. Finally, evenly spread the remaining crumbs over the peaches and bake in preheated oven for 30 minutes, or until top are slightly brown and you can see a little color around the edges.


7. Let them cool completely in pan before cutting into squares and enjoying! Can be served with a scoop of vanilla ice-cream or even just a cup of steaming coffee!

Monday, July 30, 2012

Energy packed Coconut Oatmeal Raisin Granola Bars!

Hi all. This overdue post comes with a few points. Firstly, I have been training for a half marathon race that can explain for said blogging-absence. Seriously, training is a full time job. The only payment is the the finish line. Well, I am happy to report that race is OVER, and was completed successfully!!! Cheers to all my friends that completed it with me.... we rocked it!!!! That's no joke, we really did... given it was a rock n' roll sponsored marathon. In Chicago, none the less!

All this race prep had me eating and preparing some foods that packed energy, healthful ingredients, and the carbs needed to get me going for my day's work out. Coupled with the fact that us gals wanted to be prepared come race weekend, I couldn't resist whipping up a batch of homemade granola bars to gift each of the ladies upon arrival in Chi-Town. Hence, these granola bars.

Everyone has an old box of oats, slivered almonds, grains and some dried fruits laying around. Had I known my own granola was THIS easy to pull off. I would never have bought the grocery store versions, ever. I mean.... what do they really put in those things?? All that sugar that makes them stick together & gooey....I'll stick to my own, thanks. 

Next time you want to whip up a healthy snack to throw in your bag for your weekly endeavors, try this. Swap out the ingredients for your favorite grains & dried fruits, and you've got a fail-proof recipe! Crumble them up, make pure granola, and top it with your favorite non fat yogurt! NOW, we're talkin :)

This recipe is dedicated to Maureen, Christine, Christina, Cynthia, & Dianne------ CONGRATS ON THE HALF MARATHON, LADIES!!!!!!! 


Now, when is the next one?!?!

Energy Packed Coconut Oatmeal Raisin Granola Bars

Ingredients:

2 1/2 cups oats
1 1/2 cups slivered almonds
1 1/2 cups shredded coconut
1/2 cup wheat germ
1/4 cup light brown sugar
4 tbsp unsalted butter
1/4 cup natural peanut butter
3 tbsp honey
1 cup dried raisins
1 cup dried cranberries

Preheat oven to 300F. Line a cookie tray with parchment paper and evenly spread out the oats, coconut, and slivered almonds. Toast roughly 15 minutes or until lightly browned. Every 5-7 minutes, mix the ingredients up so they cook evenly. Remove from the oven and let cool.

Meanwhile, in a small saucepan melt the butter, peanut butter, brown sugar, and honey until comes to a slow boil, reduce heat, simmer, and stir constantly. Cook down for 3-5 minutes. In a large heat proof bowl, add the toasted oats/nuts mixture & add wheat germ & dried fruits. Add the melted & cooled butter & peanut butter mixture and mix throughly. 

Line an 8 by 12 baking dish (similar to a brownie pan) with parchment paper, and evenly spread out the mixture. Using a large spoon, and your hands, press the mixture down with a little pressure to create an even, bar-like spread. Bake at 300F for 30-35 minutes or until browned thoroughly (but don't burn!). Your kitchen will smell like heaven. Remove from the oven, let cool thoroughly, then refrigerate 2-3 hours at minimum. Remove, slice, and serve! SAVE THE BITS THAT FALL OFF--- this stuff makes kick a$$ granola!


Friday, July 6, 2012

Peanut Butter & Jelly Thumbprint Cookies


It is no unusual habit in my family for someone, or multiple people, to crave desserts at a crazy hour of the night. So, at 9pm, after a massive BBQ had gone down and we all swore we were "so full it hurt" I found myself, my sister and cousin itching for something sweet. Scouring the pantry, a York peppermint party and a pack of gum just wouldn't cut it. We needed something better.

Solution? Bake.

But what to bake, at 9pm, that would be quick and easy enough to put together? Minimal effort was key here, folks. I must admit, I was a couple of cocktails to the wind by this point in the day (it's July 4th weekend. Booze is a given. Don't judge). Anything requiring much effort was going to just end badly. Most likely with me swearing at the oven, or a family member.

So to keep it simple, I decided on a tride & true PB&J combo. I threw these ingredients together in my stand mixer, and 20 minutes later (in total, from mix to bake to eat) we were all licking our fingers in triumph.

The next time you need a little dessert pick-me-up in a pinch, these peanut butter & jelly thumbprint cookies will do just the trick. You don't even need flour!

And really. What's more American than peanut butter & jelly?

Ingredients:

1 1/4 cup natural peanut butter (if you have regular pb, use 1 cup plus 1 tbsp melted unsalted butter)
3/4 cup granulated sugar
2 eggs
1 tbsp vanilla extract
2 tbsp room temperature unsalted butter

Yields: 20-24 small cookies

Preheat oven to 350F. Meanwhile, in a bowl with a stand or hand mixer (or get ready to get your hands dirty!), beat all ingredients until rough dough forms. You will see it come together in the bowl, resembles a thick sugar cookie dough or gingerbread dough. If you still need some moisture, add 1 tbsp of melted butter (unsalted).


Using a teaspoon, scoop up 1 heaping teaspoon of batter at a time, using your palms roll into a little dough ball and place on cookie sheet. Press down with your thumb to create a deep well in the center without puncturing the bottom. Fill the well right up to the top with your favorite jam, and continue for each cookie (I used strawberry). 


Bake 8-10 minutes or until browned and slightly firm to touch. They will still seem slightly soft, but have no fear as they will set as they cool!

Happy Birthday, America!


Saturday, June 16, 2012

Luscious Lemon Pudding

When I was a kid, one of my all time FAVORITE after school snacks was a plain ole' tub of lemon pudding. Yes, lemon pudding. I know, I was a weird kid.

My mother was, and is to this day, a teacher. Some days I would need to wait for her at an after school program, and this program always... always... served some sort of pre-packaged USDA government approved snack. Most of the time, it was pretty pathetic. I can't even remember what some of these sorry snacks were. Except one. The large tub of lemon pudding. I would see this tub, and thank God my mom had to work late that day. The lemon pudding had arrived, and all was right with my world.

Oh, the simplicities of being a child. Sigh.


I have yet to find a lemon pudding at my grocery store, and with it being summer & all, I figure it is about time I made my own. 

And damn, was it EASY!!! This recipe is so simple, I am sure even my mom could appreciate the luscious lemon simplicity. The ingredients can easily be substituted for a soy based pudding, low fat snack, or any other combo of fruit flavors. 

But for me, this lemon pudding is just... heavenly.

Ingredients:


3/4 cup sugar
1/4 cup corn starch
3 egg yolks
1/4 tsp salt
2 tbsp fresh lemon zest, finely grated (about 4 lemons)
2 1/2 cup whole milk
1/2 cup fresh lemon juice (about 4 lemons)
2 tbsp unsalted butter, room temp


In a medium saucepan, whisk together sugar, corn starch, salt, egg yolks (tip: lightly beat the egg yolks in a separate bowl first before pouring into sauce pan, helps to keep them from curdling), milk, and lemon zest. Put heat on medium and whisk frequently. As sauce thickens, whisk constantly to keep yolks from curdling & mixture from boiling. You don't want it to boil! Reduce heat a tad if you have to. Mixture will go from liquid to pudding form almost instantly, you will notice when this happens (around 10 minutes). As it thickens, add lemon juice & butter until well incorporated, butter has melted, and you reach desired consistency (maybe 1-2 more minutes). It will easily stick to the back of your ladle. Remove pudding from heat.


Meanwhile, set up a mesh sieve over a medium to large bowl. Push pudding through sieve to remove the zest & any lumps that may have formed- you will really have to push it through with a ladle.


Cover pudding tightly with cling wrap (tip: to keep a film from forming over the top, push the cling wrap down to the very top of the pudding, sealing it in with almost no air. Refrigerate for minimum of 3 hours, or until you just can't help yourself anymore and must eat it immediately ! This is just as good warm as it is chilled! Top with fresh whipped cream, granola, blueberries..... The sky is the limit to this lemony summer dessert! Lactose intolerant? Soy milk will hold up just fine for a low fat version!


Monday, May 14, 2012

Lemon Shortbread Wafer Cookies


This week, as I cleaned out my fridge to make room for some new groceries, I seemed to have 3 spare lemons starring at me. How they escaped my white sangria recipe (to come later), I have no idea....

....and there isn't much you CAN'T do with a lemon. But what would I be if not a baker and made some type of dessert out of this? When life hands you lemons, you make Lemon Shortbread Wafer Cookies!!!

This simple recipe is the easiest shortbread wafer cookie you will EVER make. Check it out, this spring time cookie will not go unnoticed. I might just have to pair them with my white sangria at my next gathering... hhmmm

Ingredients:

2 1/3 cup flour
1/4 tsp baking soda
1/2 tsp salt
2 sticks unsalted butter, room temp
1/2 cup sugar
zest & juice of 3 medium sized lemons

In a large mixing bowl, cream together the butter, sugar, lemon zest & juice until light & fluffy, roughly 2-3 minutes. Crucial that the butter is room temp!

Meanwhile, in a separate bowl sift together flour, baking soda, and salt. Slowly incorporate the flour mixture into the creamed butter in small batches at a time. Once you have added 1-2 additions, you will need to mix by hand as it gets thick and dough-like. If the dough is still sticky after all the flour is incorporated, add 2-3 tbsps at a time until consistency is no longer sticky, and able to knead with your hands easily. Knead into a ball and wrap in plastic wrap, refrigerate for 20-30 minutes.

Preheat oven to 350F, and roll out cooled dough on a floured surface. Don't forget to flour the rolling pin, also! Roll into 1/3-1/4 inch thickness, all to your preferability (I like my cookies a little thicker, but allow for an extra 1-2 mins of baking time)! Get out your favorite cookie cutter, slice, and place on greased baking sheet. Bake for 10-12 minutes or until lightly browned on the edges. Cool thoroughly on a baking rack and serve immediately, or store in an air tight container for up to 10 days.


Friday, March 30, 2012

BEST THING I EVER ATE!


Brace yourselves people! This post is huge, dynamite in fact. Beware, this recipe is definitely laborious but the resulting goodness of this dessert is absolutely 110% percent worth every ounce of sweat that goes into it.
The soft, moist layers of chocolate crepe will make you forget any cake you ever ate. The creamy, fluffy whipped cream is the perfect accent to the intense coffee ganache and tangy raspberry jam. All in all, it's a marriage made in heaven!
I was fortunate enough to have a dear friend help me, so recruit your buddies to help you and make a party out of it! 

Chocolate Crepes

1/4 cup water
1 1/2 sticks cold unsalted butter, cut into pieces.
8 ounces semi-sweet chocolate
1 1/2 cups flour
1/3 cup confectioners sugar
1/2 teaspoon salt
2 1/2 cups whole milk, room temperature (All I had was Heavy cream so I used 1 cup of that instead)
6 large eggs, room temperature
1 tablespoon pure vanilla

1. Start by heating 1/4 cup of water in a saucepan, once it comes to a summer start adding the butter in, one piece at a time. Whisk each piece until melted and then add the next piece.
2. Remove from heat and add the chocolate, whisk until smooth and set aside.
3. In a separate bowl, mix the dry ingredients together: Flour, Sugar and salt.
4. In a large bowl, add the eggs, milk (heavy cream) and vanilla and whisk to combine.
5. Now slowly incorporate the dry ingredients, in batches and whisk until combined.
6. Finally, add the chocolate and butter mixture and combine into a smooth paste.

At this time, if your batter is too thick, add more water to thin it out. (I ended up with a thick batter, but maybe that's because I used heavy cream instead of milk). You want a runny consistency to this batter, but not too thin either. The batter should be spreadable so the crepes come out nice and thin.

7. Now heat your skillet on low to medium heat and spray with some oil or butter. This will take a few trials so don't worry if the first few crepes don't come out perfect. You have plenty of batter to experiment with!
8. I started by using a 1/4 cup measuring spoon to spoon the batter in equal quantities. Pour batter on heated skillet and using the handle of the skillet, move it in circular motions to spread the batter in an even thin layer.
9. Once the batter looks dry-ish on the surface, turn the crepe over and cook for another minute.
10. Remove the crepe and transfer to a cooling rack. Repeat steps 8 -10 until you have 20 good thin crepes.


Once all crepes have completely cooled, cover them with some cling wrap and set aside. You can also refrigerate them at this point if you intend to assemble the cake the next day.


Coffee Ganache

1 cup heavy cream
12 ounces bitter sweet chocolate (chopped in small pieces)
1/2 cup of freshly brewed coffee (you can substitute with 2-3 tbsp of instant coffee powder)

1. Add the heavy cream and chocolate in a saucepan and heat on low-medium heat. Whisk continuously until the mixture is smooth.
2. Remove from heat and add the coffee and whisk to mix well.
3. Set aside to cool/you can also refrigerate this.

Whipped Cream - I mean come on! Do you really need a recipe for this!? I used about a cup of whipped cream with 2 tbsp of Confectioners sugar

1/2 cup of Raspberry Jam - whisked into a smooth paste

Assembly Line!

Set out the Crepes, Ganache, Whipped cream and Jam to form an assembly line

On a large cake dish or serving plate, start layering the ingredients: First a crepe, spread with ganache and layer another crepe. Then spread the whipped cream topped with another crepe and finally the raspberry jam. And repeat end with a crepe.


Transfer the cake to the refrigerator now, and let it cool and set for at least an hour.

Finally, you are ready to ice this baby! I had plenty of left over ganache and whipped cream so I mixed the two to make Coffee Whipped Cream and used that as the icing.


Transfer the iced cake back into the refrigerator. Ideally you should let it set overnight, but I was too eager and excited so I cut into this bad boy, so after refrigerating for an hour I whipped out the knife and had myself a nice big slice! It was delicious, moist, creamy and tangy!


Definitely THE BEST THING I EVER ATE!

Thursday, March 29, 2012

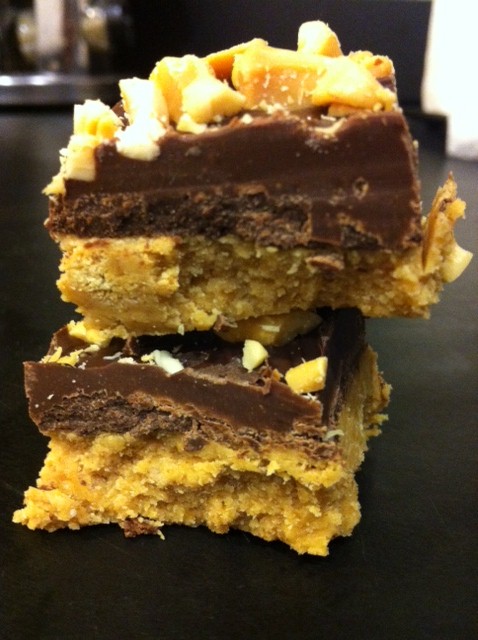
Chocolate Peanut Butter Fudge Bars

Parting is such sweet sorrow. This has been a tough week for this gal to endure, as I embark upon a new journey in my career and have to say goodbye to some of the nearest & dearest friends & colleagues anyone could ask for.

To show my love & appreciation, I just couldn't leave without one last effort to deliver some sweet treats to everyone on the team. A hectic week I've had left me with some options... I wanted something easy, simple, but still amazing. By request of a few special peeps, chocolate + Peanut butter was their choice. But chocolate peanut butter...... what? cookies? cupcakes? The options are endless. I settled on a no-bake bar. Alla fudge style.

These couldn't be easier to throw together. A food processor (or simply a bowl will even do, with a fork to mix), a microwave, and a freezer/refrigerator is all that is needed. Next time you need to bake to impress, check this out. Best part? NO BAKING!


Ingredients:

PB layer:

2 1/2 cups crushed graham crackers

3/4 cup unsalted butter, melted

1 cup creamy, natural peanut butter (your favorite brand  of PB will do just fine)

1 3/4 cup powdered sugar

Chocolate layer:

1 3/4 cup semi sweet chocolate morsels
1/3 cup creamy peanut butter

Topping:
1 cup chopped salted peanuts


Assembly:

In your food processor (or in a medium bowl), combine the ingredients for the Peanut Butter layer. Pulse together the crushed graham crackers, butter, peanut butter, and powdered sugar until well combined and it forms a sticky dough. If you don't have a food processor, crush up the graham crackers in a bag or seperate bowl, then add to the mixture and incorporate thoroughly. Grease a 9x9 inch pan and line with parchment paper. Spread the peanut butter layer evenly and place in the freezer while you assemble the chocolate layer.

In a microwavable bowl, combine the chocolate chip morsels, and the remaining 1/3 cup peanut butter. Microwave for 30 seconds at a time, after each 30 second internal mix the morsel mixture well to spread out the heat. Microwave again for 30 seconds, stirring very very well until the mixture is melted and incorporated. Let it cool for a few minutes, then pour over the peanut butter layer. Top with crushed peanuts evenly, and place in the fridge for at least 20 minutes or until sets firmly. Slice with a warm knife, and enjoy! If no serving immediately, keep stored in the fridge until served.