Thursday, March 29, 2012

Chocolate Peanut Butter Fudge Bars

Parting is such sweet sorrow. This has been a tough week for this gal to endure, as I embark upon a new journey in my career and have to say goodbye to some of the nearest & dearest friends & colleagues anyone could ask for.

To show my love & appreciation, I just couldn't leave without one last effort to deliver some sweet treats to everyone on the team. A hectic week I've had left me with some options... I wanted something easy, simple, but still amazing. By request of a few special peeps, chocolate + Peanut butter was their choice. But chocolate peanut butter...... what? cookies? cupcakes? The options are endless. I settled on a no-bake bar. Alla fudge style.

These couldn't be easier to throw together. A food processor (or simply a bowl will even do, with a fork to mix), a microwave, and a freezer/refrigerator is all that is needed. Next time you need to bake to impress, check this out. Best part? NO BAKING!
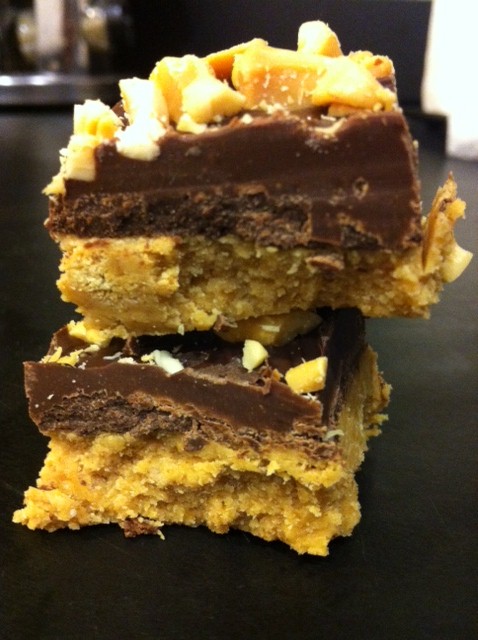


Ingredients:

PB layer:

2 1/2 cups crushed graham crackers

3/4 cup unsalted butter, melted

1 cup creamy, natural peanut butter (your favorite brand  of PB will do just fine)

1 3/4 cup powdered sugar

Chocolate layer:

1 3/4 cup semi sweet chocolate morsels
1/3 cup creamy peanut butter

Topping:
1 cup chopped salted peanuts


Assembly:

In your food processor (or in a medium bowl), combine the ingredients for the Peanut Butter layer. Pulse together the crushed graham crackers, butter, peanut butter, and powdered sugar until well combined and it forms a sticky dough. If you don't have a food processor, crush up the graham crackers in a bag or seperate bowl, then add to the mixture and incorporate thoroughly. Grease a 9x9 inch pan and line with parchment paper. Spread the peanut butter layer evenly and place in the freezer while you assemble the chocolate layer.

In a microwavable bowl, combine the chocolate chip morsels, and the remaining 1/3 cup peanut butter. Microwave for 30 seconds at a time, after each 30 second internal mix the morsel mixture well to spread out the heat. Microwave again for 30 seconds, stirring very very well until the mixture is melted and incorporated. Let it cool for a few minutes, then pour over the peanut butter layer. Top with crushed peanuts evenly, and place in the fridge for at least 20 minutes or until sets firmly. Slice with a warm knife, and enjoy! If no serving immediately, keep stored in the fridge until served.

Wednesday, March 28, 2012

"Quick" Coq Au Vin

Coq Au Vin. It sounds so fancy.

So.... French.

And probably something you'd need to Ouija-board style invoke the spirit of Julia Child to create. Right? Wrong. Leave it up to the French to make something so mouth-wateringly decadent sound so hard to make.

Simmer some chicken in a bacon-mushroom infused red wine broth, and you have this dish. I couldn't get enough of it, and I have never been so excited for leftovers in a long, long, long time.

Next time you need a big pot of food to last you through the week, you will not regret this recipe.

As Julie Child says - "Buon Appetit!"

Ingredients

2 lbs boneless skinless chicken breasts, chopped into small-medium size chunks
4 slices bacon, diced
3 large carrots, diced into small rounds
1 medium red onion
2 pints baby portobello mushrooms, sliced in half
2 cups chicken broth plus 1/2 cup
2 cups red wine
6 tsp all purpose flour
Olive oil
Salt & pepper
1 tsp dried parsely
1 tsp dried, ground bay leaf, optional

Begin by heating olive oil in large skillet, just enough to coat bottom of the pan. Sauté chopped bacon until brown, add diced chicken and season with salt & pepper. Sear the chicken, then reduce heat and cover to let chicken cook through. (Dice the chicken into small-medium size chunks for even cooking time).

Meanwhile, prepare a large pot with olive oil, and sauté the diced red onion & carrots. Season with salt & pepper. Sauté until carrots soften and onions caramelize. Roughly 5 minutes. Clean & slice mushrooms, add to pot. Stir and mix well. Sautéed another 2-3 minutes. Add 2 cups broth, red wine, and mix well. In a small bowl, add flour and remaining 1/2 cup broth and mix well until clumps dissolve. Add flour mixture to pot, mix well, and reduce to a summer. Add cooked chicken & bacon with a slotted spoon (to sift out grease/excess liquid), season with salt & pepper, dried parsley & bay leaf if desired. Stir, cover, and let cook for roughly 30 minutes until sauce thickens and flavors marry. Let cool, and enjoy!

Yields: a ton of quick au vin!

Tuesday, March 27, 2012

Calabash and Cauliflower soup


Also called a Bottle Gourd; Calabash has a tremendous amount of health benefits and is also a very delicious vegetable. It's low in fat and cholesterol yet high in dietary fibre. It is excellent for light, low-cal diets, as well as for people with digestive problems or diabetics. The Calabash's high water content makes it very cooling, yet a low-cal hearty option for meals. Even consuming plain Calabash can be a very good diuretic and is rich in iron and vitamins C and B.

The Calabash has a natural sweetness, which when combined with the creaminess of potatoes and cauliflower, transforms into a
dish that will rule your heart for sure. The versatility of this vegetable lends itself to a spicy masala dish, can be cooked with lentils for a healthier option and can also be turned into a dessert! That's for another post though...


1 medium size Calabash
1 cup of chopped Cauliflower
2 small potatoes
1/2 cup of corn
1 small white onion
1 green chili (optional)
1 teaspoon of sugar
Chili oil (optional) or Chives/Parsley for garnish


1. Peel and chop the Calabash, cauliflower, corn, potatoes and onions in even medium size pieces
2. In a large pressure cooker, add the chopped vegetables and a sliced green chili, add at least 2-3 cups of water
3. Secure the lid (put on the whistle if you have an old school cooker like mine!) and cook on medium-high heat for at least 30 minutes (or 5 whistles)
4. Once the pressure cooker is cooled, open the lib and puree the vegetables using a hand blender
5. Filter the liquid through a sieve and into a large pot, add salt, pepper and sugar and cook on medium heat for another 10 minutes

Serve hot with a drizzle of chili oil or minced parsley or chives! This is a perfect creamy yet healthy soup for any weeknight meal. I usually make a large quantity and store it in my fridge for later use. And guess what, it actually makes for an amazing pasta sauce!!

Friday, March 23, 2012

Chocolate Chunk Banana Pudding with Banana Chocolate Cake


I brought this magical cake to work to help celebrate a coworker's Birthday and the end of the week! Hooray for Friday!! And in case you are wondering....the entire cake was gone in 8 minutes!!
Yes, I counted. Yes, with a stop watch!


Never was there a more perfect marriage of ingredients than when Bananas and Chocolate mated together! Well, that's if you don't count Wine and Cheese or Chocolate and Chocolate....

Aaannyways...the point is....this cake is THE BOMB. It's an explosion of flavors that you never thought could be achieved by a banana! Forget the boring old Banana Bread you've been making...this is Banana Bread on crack, yo! And before you ask, NO, it's not TOO much Banana in the recipe!


Upon tasting this beast of a dessert, my very health conscious coworker commented, "I've never in my life tasted anything like this. EVER!". Mind you, Sarah is as health conscious as pretty, tall, thin and gorgeous women come. So her review was like getting a five star Zagat rating! I was even surprised she tasted it, because she never so much as eats a cookie even!

Try it out and let me know what you think. How many Zagat stars would you give this dessert?

Banana Chocolate Cake...Hey if it ain't broke....
I love our original Chocolate Cake recipe so I stick with it. Just add 2 large bananas, pureed; to this recipe. You will need over ripe bananas.

Chocolate Chunk Banana Pudding
8 oz cream cheese, softened
1/2 cup sugar
1 small banana, pureed (over ripe banana)
1 egg
1 teaspoon vanilla
8 oz. semisweet chocolate chips

Preheat oven to 350 degrees.

For the cream cheese mixture:
  • Beat cream cheese and sugar until nice and fluffy.
  • Add banana, egg and vanilla and mix together until combined.
  • Stir in chocolate chips and set aside.
For the chocolate mixture: follow the tried and tested recipe linked above. Just add the Banana puree when mixing the wet ingredients.

You MUST line your baking pan (I used a loaf pan) with parchment paper. This is a deliciously gooey cake and the parchment will help remove it from the pan, in one piece.

1. Fill the pan with the chocolate cake batter first.
2. Next, pour the pudding mix on top

Bake for about 30 minutes or until done (I had to bake it for almost 45 minutes, just do the jiggle test to see if the pudding on top is cooked through).


Let it cool completely!! DO NOT be impatient or the banana pudding will end up all over your kitchen counter instead of in your stomach!

Thursday, March 8, 2012

Sesame Cracker Crusted, Spicy Baked Chicken

YUM!! The crispy crackers flavor the chicken with a tarragon flavor, and the dash for chili powder and cilantro gives this dish a freshness that will brighten up any boring weeknight meal!
2 large boneless skinless chicken breasts
1/2 cup of Sesame Tarragon Crackers (I used Bake to Nature brand)
1/2 teaspoon of chili powder (I like spice, but you can adjust it per your taste)
1/4 teaspoon of cumin powder
1/2 teaspoon of garlic
2 tablespoons of chopped fresh cilantro (that's what I had on hand, but you can use Parsley if you wish)
pinch of salt and pepper
1/4 cup of all purpose flour
1 egg

For the salad
1/2 cup of fresh Pea Shoots
2 teaspoons Balsamic Vinegar
Salt and pepper to taste

Preheat oven at 475 degrees.

1.  In your food processor, blend together Sesame Tarragon Crackers, chili powder, cumin powder, garlic, fresh cilantro and salt and pepper, until the mixture resembles coarse bread crumbs. Set aside on a plate.

2. In another dish,  crack an egg and beat it well. In a third dish spread the all purpose flour. This makes your assembly line ready for coating your chicken breasts.

3. You want a nice even thickness on the chicken breast so it cooks evenly, so place the breast between a sheet of cling wrap and pound it out to desired thickness. Repeat with second piece of chicken.

4. In a hot, oven proof skillet, add some olive oil.
Now begin coating your chicken, starting with the flour first, then egg, then cracker mixture. Place the coated chicken breast in the skillet and put the skillet in the oven.


10 minutes into baking, turn the chicken breasts over so you get a crispy coating on both sides. The chicken will bake in the oven for a total of 15-20 minutes, until nice and crispy, golden and delicious!

I served my chicken breasts with a simple gravy made from vegetable stock (it's what I had in the pantry) and a salad of Pea shoots tossed lightly with some Balsamic Vinegar, salt and pepper.

For a fancier version of this dish, you can stuff the chicken breasts with goat cheese and apples or cranberries and then coat it with the mixture.

Monday, March 5, 2012

Green Tea and Chocolate Cake


If it ain't broke, don't fix it! Especially when it comes to the perfect gooey chocolate cake recipe! Remember this decadent chocolate cake we made last year!? Guess what!? We're making it again, this time reinvented in the form of a Green Tea and Chocolate Cake loaf! A perfect green dessert (MINUS any food coloring!) just in time to celebrate St.Patty's day!

Healthy and delicious, the green tea pairs so well with chocolate, it's a match made in heaven. The earthiness of the green tea just elevates the bitter sweet chocolate flavor, and its one moist, gooey, tasty party in your mouth!

Check it out! The recipe has been tweaked a little to create the perfect balance of flavors.


Ingredients:

1 3/4 cup all purpose flour
1 tsp baking powder
2 tsp baking soda
3 tablespoons cocoa powder
1.5 tablespoons of Matcha Green Tea powder (available at any Asian Speciality store)
pinch salt
1.25 cups sugar
2 eggs
1/2 cup vegetable oil
1/4 cup sour cream (easily substitute this for low fat plain yogurt or vanilla yogurt)
1 cup milk
1 tsp vanilla extract


Preheat your oven to 375F

In a large bowl, sift your dry ingredients: flour, salt, baking powder & baking soda. Mix & sift well. 

In a bowl of your stand mixer or hand held mixer, gently combine the eggs, sugar, oil, extract, and milk. Once combined, add the dry ingredients a bit at a time to slowly incorporate. Lastly, add the sour cream and beat until your creamy batter has been formed and all lumps are gone.

Now, divide this batter into two equal parts. In one portion, add the cocoa powder and mix well. The second portion gets the Matcha powder to make a smooth, creamy, green batter.

Now alternating both batters, pour them into your cake loaf and bake (approx 50 minutes for a cake or until your toothpick comes out clean).

*This is quite a liquid batter, so takes longer to cook. But the resulting loaf is well risen and moist.

Once out of the oven let it cool completely before you slice and dig in! Serve with a scoop of your favorite chocolate Gelato or enjoy it as is!


Wednesday, February 29, 2012

Olive Oil Cake... with Orange, Almond and a citrus glaze

For quite a few weeks now, I have been eyeing this un-used bottle of Extra Virgin Olive Oil in my pantry. I really only cook with regular olive oil, as this "extra virgin" stuff, or as Rachael Ray calls it: "EVOO" is super fruity and adds quite a different flavor when you cook. Upon surfing the website tastespotting.com (by the way, if you don't know what it is, please check it out as it hosts the best food blogs and recipes all compiled into one big site. I may or may not have spent hours trolling this URL), I came upon an "olive oil cake" recipe. GENIUS!

Upon more hours surfing the world wide webs, the recipes all sounded pretty easy and similar to other cake recipes, but with a fruity twist. I decided to pair mine with some orange zest, and a citrus glaze to keep it moist, topped with slivered almonds for crunch. These flavor combos had my tongue thinking I was in Italy, but alas, this was surely baked in my Brooklyn kitchen, and couldn't be easier. You won't regret this if you try it. Buon Appetit!


Ingredients:

1 3/4 cups all purpose flour
2 tsp baking powder
1/2 tsp salt
1 cup sugar
3 eggs
zest of three large oranges (or 3 tbsp worth)
1/2 cup buttermilk
3/4 cup extra virgin olive oil
1/2 cup slivered almonds, for topping

Citrus Glaze:
juice of 3 large oranges
1 1/2 cup confectioner's sugar

Preheat your oven to 350F and line a 8 or 9 inch cake pan with parchment paper, lightly oil or spray the pan before lining to prevent sticking. Begin with a medium bowl and sift together the flour, baking powder, and salt. In a larger bowl using an electric mixer, or a whisk, beat together the eggs, sugar and orange zest until the eggs are light and fluffy, sugar is creamed and the mixture about doubles in size (takes roughly 5 minutes if using the electric mixer). Beat in the buttermilk until incorporated, then gradually add the olive oil, little by little, continuing to use the electric mixer or whisking swiftly. This will prevent the batter from looking like an oil&water mess, and rather create a nice emulsion. Once fully incporporated, take the flour mixture and add little by little by folding in with a spatula. This will keep the cake from deflating. Add the batter to your greased/lined cake pan and evenly top with the slivered almonds. Bake for 35-45 minutes (my oven took 47 minutes, so be sure to use the toothpick test and wait until it comes out clean in the middle of the cake). Let cool thoroughly on a drying rack. Prepare the glaze: juice your oranges and add the sugar, & whisk together until sugar fully dissolves. Poke some holes in your cake with a toothpick in an even manner (not too many, just enough to let the glaze seep through in each part). Gently glaze the enture surface area of the cake with a small spoon, and let dry.

SERVE AND DEVOUR!